Installation Instructions
KRUU Photobooth Basic
Set up of the photo booth. Easy peasy.
Note on the set up:
· Only suitable for indoor use
· No direct sunlight
· The printer cannot be operated at temperatures below 10 °C and high humidity
Note on the return
First, please stick the return labels over the shipping labels! You also find your return labels available for download in your online customer portal!

KRUU Photobooth Basic –included
KRUU audio guest book
ecco come funziona.
Rendi indimenticabile il tuo evento e cattura le voci dei tuoi ospiti. Scopri qui come preparare l'audio guest book in pochi passaggi.
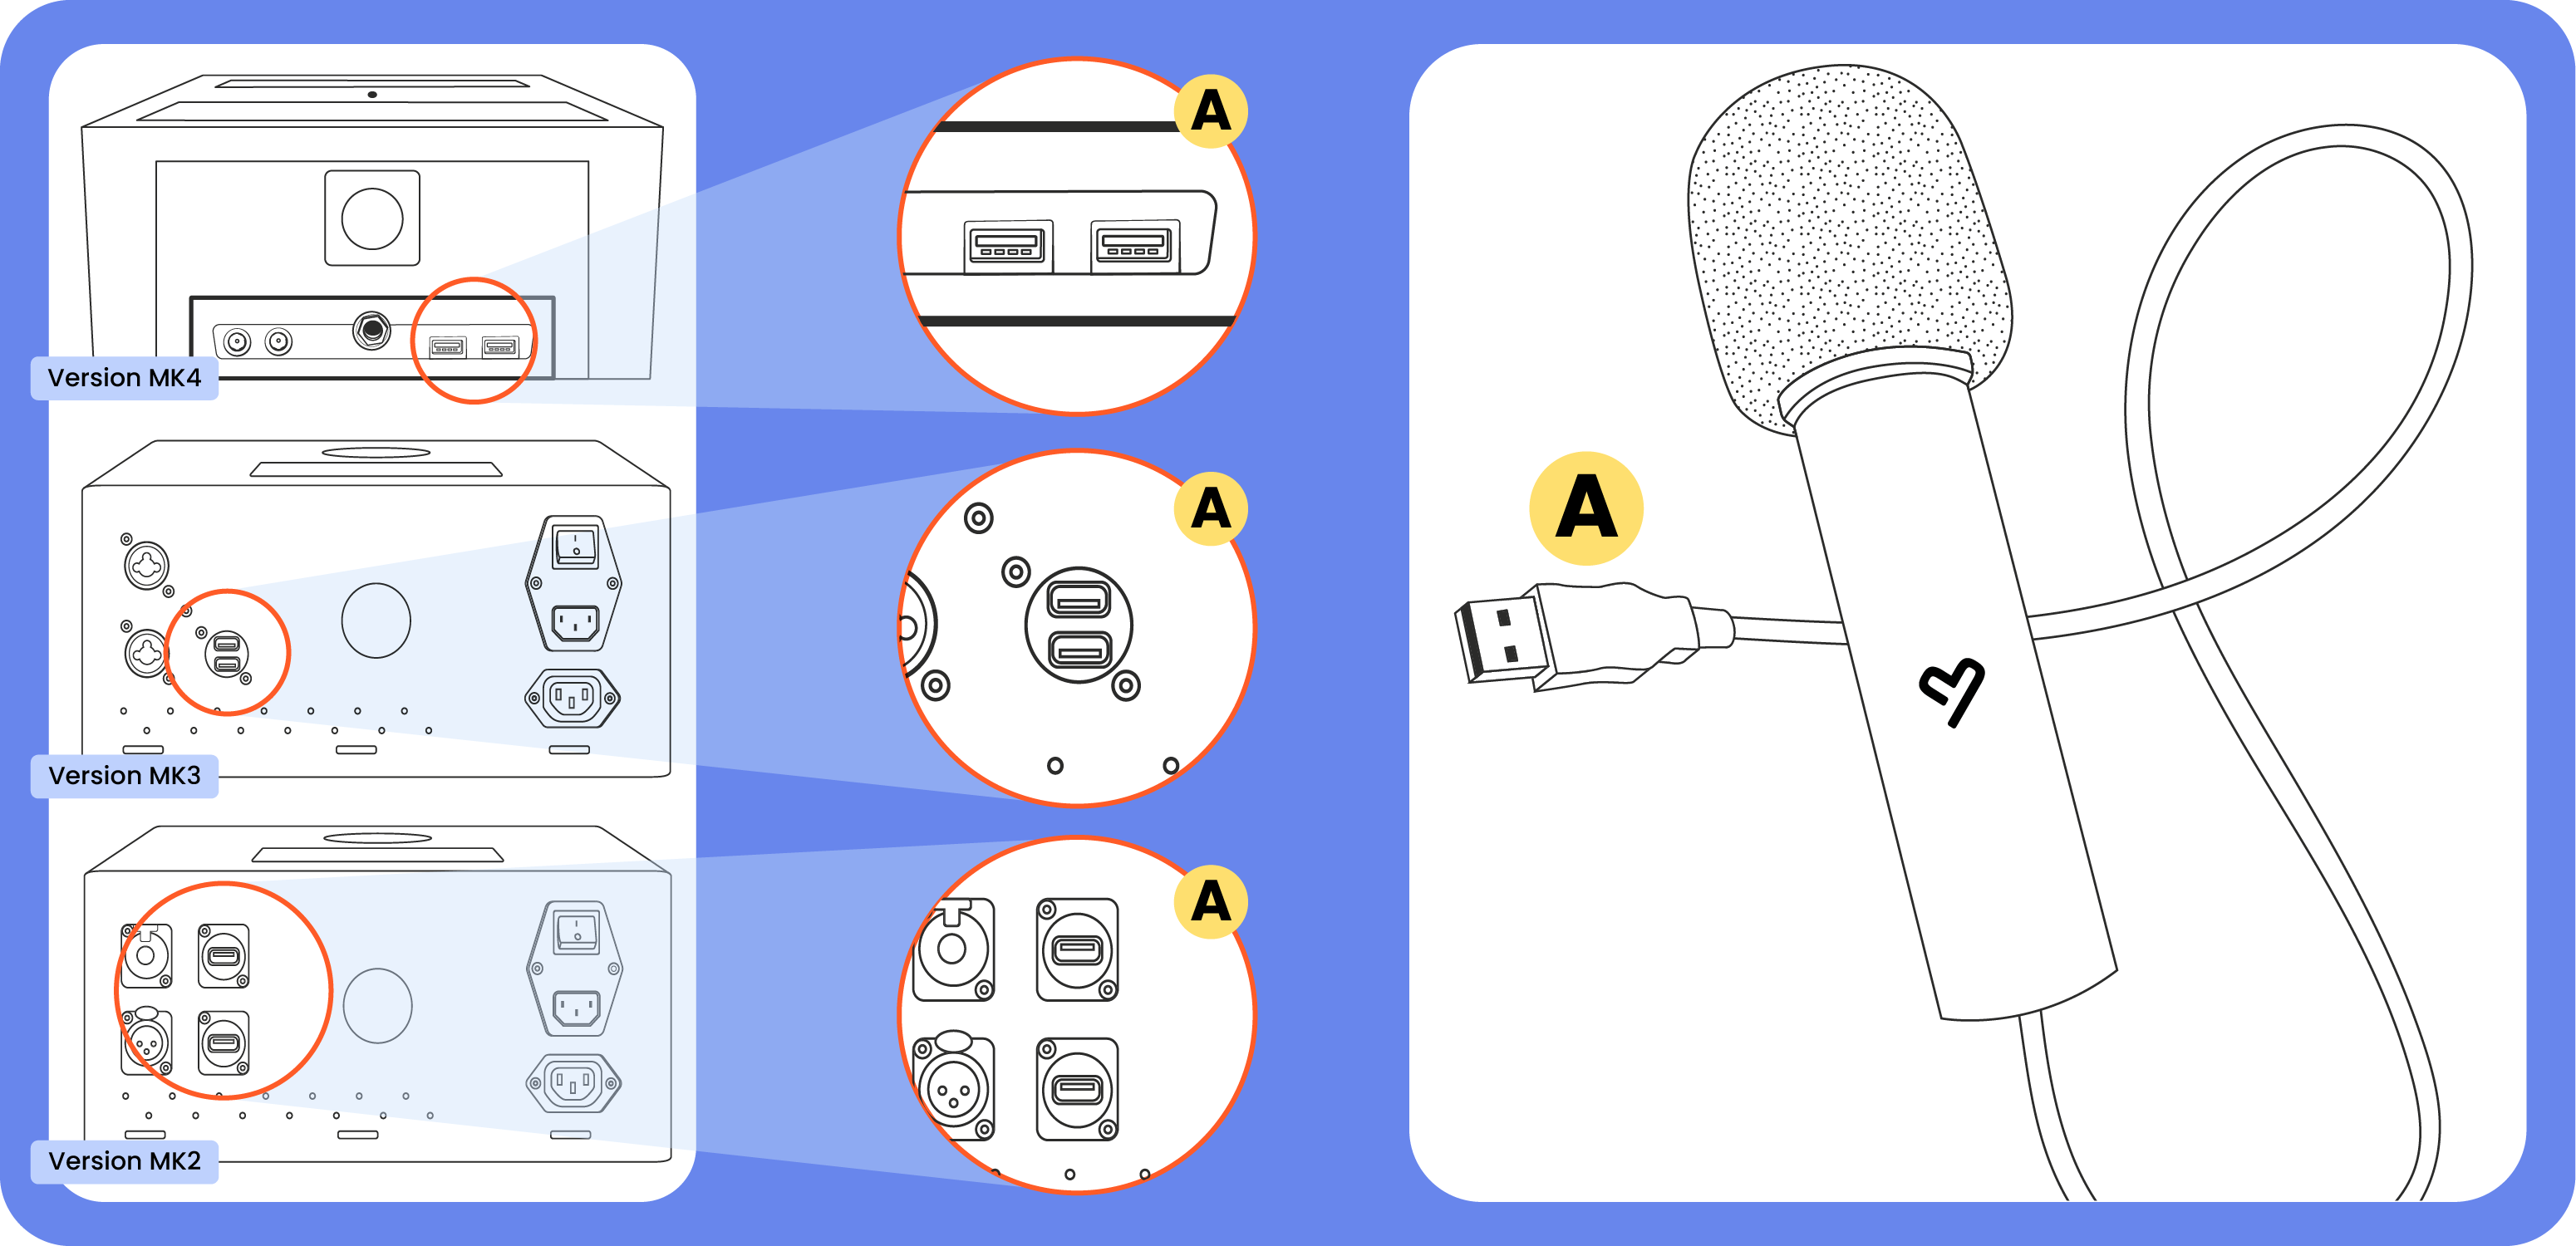
1. Collegare il microfono: Inserisci semplicemente il cavo del microfono in una delle porte USB libere della tua Fotobox KRUU.
- Versione MK4: Le porte USB si trovano nella parte inferiore del dispositivo.
- Versione MK3 & MK2: i collegamenti si trovano sul retro della fotobox.
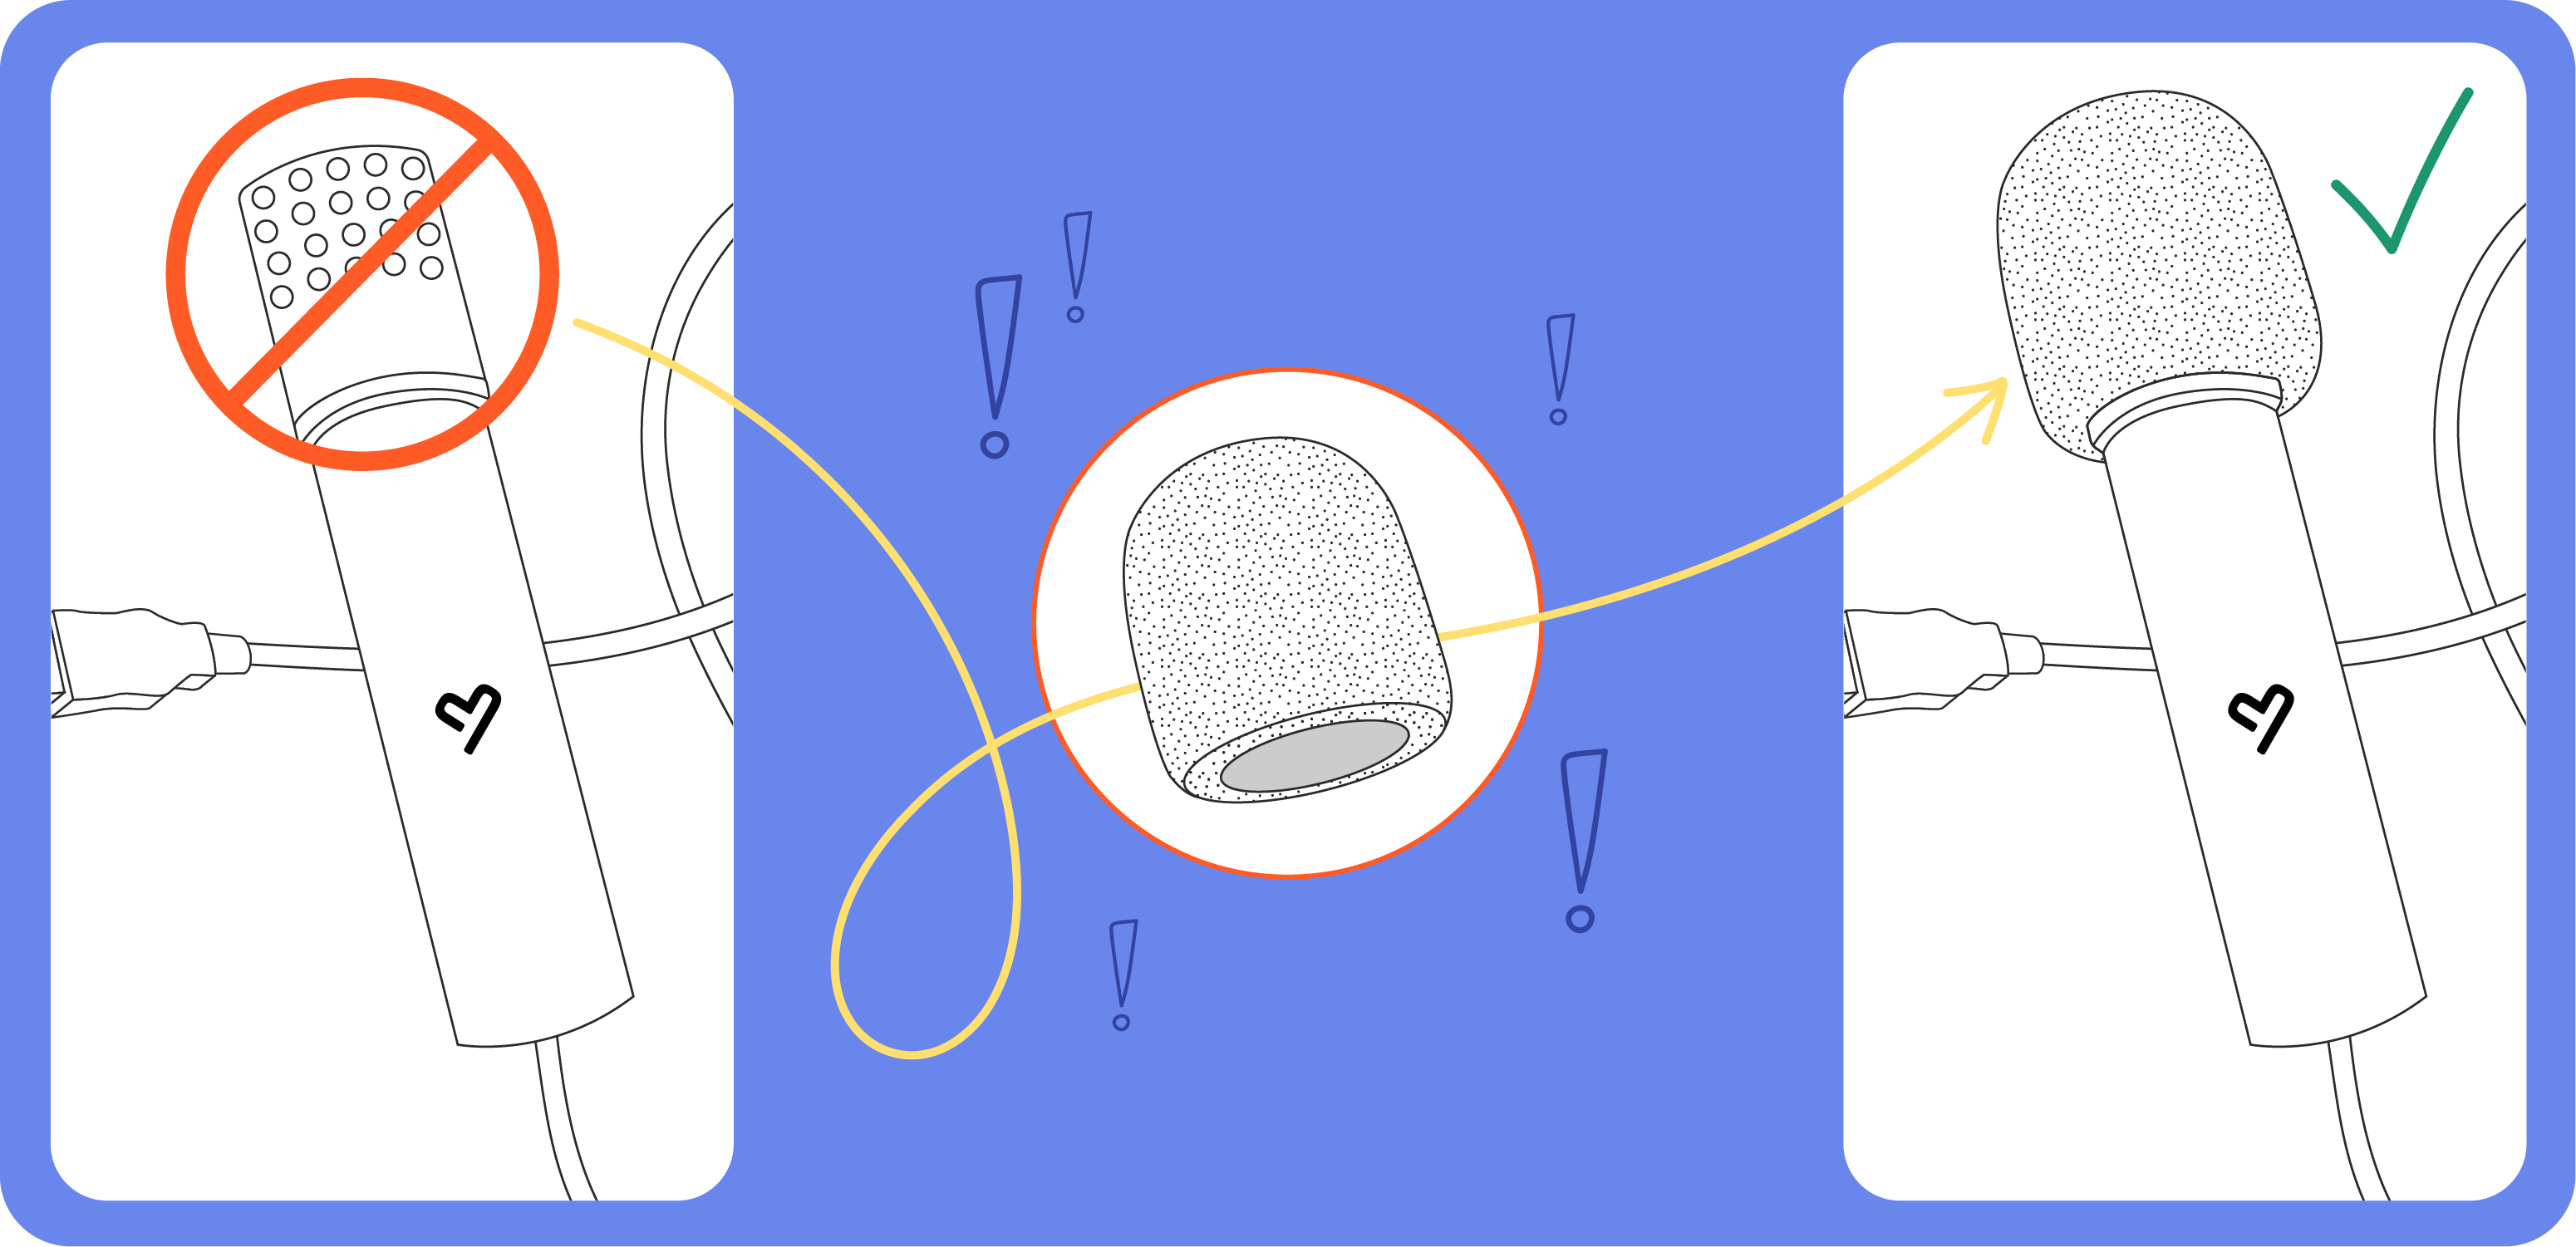
2. Applicare la protezione in spugna. Per far sentire al sicuro i tuoi ospiti: usa la protezione in spugna in dotazione. Infilala semplicemente sulla testa del microfono.
3. Attivazione automatica: Non appena il microfono è collegato correttamente, il pulsante "Audio" si attiva automaticamente sullo schermo. I tuoi ospiti possono ora registrare i loro messaggi vocali (max. 60 sec.).
4. Registrazione e correzione I tuoi ospiti pronunciano i loro auguri direttamente al microfono. Dopo la registrazione hanno la possibilità di scegliere: il messaggio può essere salvato subito o, se non piace, semplicemente registrato di nuovo.
5. Dopo l'evento: tutte le registrazioni vengono salvate in modo sicuro e, al massimo sette giorni dopo il rientro della Fotobox KRUU nel nostro magazzino, tutti i messaggi vocali verranno caricati e saranno a tua disposizione nell'App KRUU.
Consiglio: registra in anticipo il tuo messaggio di benvenuto personale nell'App KRUU. Così i tuoi ospiti verranno accolti direttamente dalla tua voce!
Instant Pic Download: la tua foto direttamente sul tuo smartphone!
Ecco come salvare facilmente il tuo collage nella tua galleria:
1. Scansiona e apri l’app
Scansiona il codice QR che appare sullo schermo della fotobox dopo aver scattato la foto. Utilizza la fotocamera del tuo smartphone o lo scanner direttamente nell’app KRUU.
- Non hai ancora l’app? La fotocamera ti porterà direttamente all’app store (scarica l’app velocemente, non è necessario effettuare l’accesso!).
- Hai già installato l’app? Si aprirà automaticamente e inizierà il processo.
2. Avvia il download e concedi le autorizzazioni
Tocca il pulsante visualizzato per avviare il download. Affinché la connessione alla fotobox funzioni, il tuo smartphone necessita delle seguenti autorizzazioni:
Abilita Wi-Fi: Attiva il Wi-Fi sul tuo smartphone. Solo così è possibile stabilire una connessione con il Wi-Fi della fotobox.
Consenti accesso: conferma l’accesso alla tua posizione (su Android: “Posizione precisa”) e alle tue foto/galleria.
Connetti: conferma il messaggio di sistema che indica che il tuo smartphone è autorizzato a connettersi alla fotobox.
3. Salva e divertiti
Resta vicino alla fotobox per qualche istante durante il download. Non appena la barra di avanzamento sarà completa, la foto verrà salvata automaticamente nella galleria del tuo smartphone.
Suggerimento: scarica l’app KRUU prima dell’evento: ti farà risparmiare tempo sul posto!
Help videos
Photobooth: Set it up
Photobooth: Connecting cables
Photobooth: Save images on a USB stick
Photobooth: Configure new design
Photobooth: Lock camera
Photobooth: Start next shoot
Photobooth: Print collage
Canon Selphy – printer: Insert paper sheets
Canon Selphy – printer: Insert / change colour ribbon
Canon Selphy – printer: Insert paper sheets correctly
Canon Selphy – printer: Paper cassette missing
Canon Selphy – printer: Insert new colour ribbon
Canon Selphy printer: Reset
Flash: Faulty sync cable
Flash: Reset
Selphy printer - insert paper
Open the paper bin
Open the paper bin to insert the paper.

Loading paper
Take a pack of the enclosed paper stock and insert it into the paper bin with the glossy side facing up. Notice! A maximum of 18 sheets (1 pack) may be inserted.

Closing the paper drawer
Close the paper bin. Make sure that the paper tray remains half open.

Inserting the paper bin
Insert the paper bin into the selphy printer.

Selphy printer – Replacing printer ink
Open the lid of the printer

Removing the empty color ribbon
Press the red switch up to remove the ribbon.

Dispose of the empty color ribbon

Inserting the color ribbon
Insert the new ribbon and close the lid of the printer.

NOTE
Push On Button for 3s. Do not touch any other key!
Our support. At your service.

Call us directly at 051 889 5703
Just send us an email to support-it@kruu.com
In case of technical questions we are available for you on Friday & Saturday until 9 pm!
Conformità e note legali
Modelli di fotobox (MK2, MK3, MK3b, MK4) Con l'attivazione del modulo Wi-Fi, il fotobox diventa un'apparecchiatura radio ai sensi delle direttive UE. Le seguenti informazioni fanno parte dell'obbligo di informazione legale.
Frequenze radio e potenza di trasmissione Frequenze: 2.400 – 2.483,5 MHz Potenza di trasmissione: max. 100 mW e.i.r.p.
Dichiarazione di conformità UE Con la presente KRUU GmbH dichiara che i modelli di fotobox MK2, MK3, MK3b e MK4, nonché l'alimentatore utilizzato del tipo HKY, sono conformi alla direttiva 2014/53/UE. Il testo completo della dichiarazione di conformità UE è disponibile qui:
Documentazione tecnica e conformità: Audio Guestbook
Con la presente KRUU GmbH dichiara che l'Audio Guestbook (modello KRUU Mila V1.0) è conforme alle direttive 2011/65/UE (RoHS) e 2014/30/UE (EMC). La dichiarazione di conformità UE completa e gli altri rapporti di prova sono disponibili qui:
Safety Precautions
NOTE
For safety reasons, the following precautions must be observed!
Power supply
• This photo booth is designed for 230V/50Hz AC operation in Europe.
• The device must never be connected to a power supply that deviates from the specified voltage and/or frequency values.
• For the use of the KRUU Photobooth it needs a technically faultless and with a residual current circuit breaker fused (RCD/FI), earthed Schuko socket (230V/16A). The connections used must be made by a specialist and comply with the current DIN/VDE regulations.
Protection class and usage site
The device complies with protection class 1/IP20 – permitted usage site: Indoors (no humid rooms).
WARNING: DANGER TO LIFE!
Never open the casing of the photo booth, the flash, or the printer to perform any repairs or trouble-shooting of electronic parts. There are live parts in the casing of these devices, which can cause a lifethreatening electric shock if touched!
Canon SELPHY CP 1300/1500
• Be sure to read these instructions in order to operate the product safely.
• Follow these instructions to prevent injury or harm to the operator of the product or others.
Warning
Denotes the risk of serious injury or death.
• Use only power sources specified in this instruction manual for use with the product.
• Do not disassemble or modify the product.
• Do not expose the product to strong shocks or vibration.
• Do not touch any exposed internal parts.
• Stop using the product in any case of unusual circumstances such as the presence of smoke or a strange smell.
• Do not use organic solvents such as alcohol, benzine or paintthinner to clean the product.
• Do not get the product wet. Do not insert foreign objects or liquids into the product.
• Do not use the product where flammable gases may be present. This may cause electric shock, explosion or fire.
• Do not touch the product connected to a power outlet during lightning storms. This may cause electric shock.
• Periodically remove any dust buildup from the power plug and power outlet using a dry cloth.
• Do not plug in or unplug the product with wet hands.
• Do not use the product if the power plug is not fully inserted into the power outlet.
• Do not expose the power plug and terminals to dirt or let them come into contact with metallic pins or other metal objects.
• Do not touch the battery charger or AC adapter connected to a power outlet during lightning storms.
• Do not place heavy objects on the power cord. Do not damage,break or modify the power cord.
• Do not wrap the product in cloth or other materials when in use or shortly after use when the product is still warm in temperature.
• Do not leave the product connected to a power source for long periods of time.
• Do not charge batteries/battery packs at temperatures outside the range of 5 – 40 °C. This may cause electric shock, explosion or fire.
• Follow any indications to turn off the product in places where its use is forbidden. Not doing so may cause other equipment to malfunction due to the effect of electromagnetic waves and even result in accidents.
Caution
Denotes the risk of injury.
• Do not touch any parts inside the product. This may cause injury.
• Avoid using, placing, or storing the product in the following places:
- Places subject to direct sunlight
- Places subject to temperatures above 40 °C
- Humid or dusty places
- Places subject to strong vibration
This may cause overheating of or damage to the printer or adapter, which may result in electric shock, burns or other injury, or fire. High temperature may deform the product or adapters.
Caution
Denotes the possibility of property damage.
• Unplug the product from the power outlet when you are not using it.
• Do not place anything, such as cloth, on top of the product while in use.
Leaving the product plugged in for a long period of time may cause it to overheat and distort, resulting in fire.
• Never reuse paper for printing, even if most of the paper is blank. Reusing paper may damage the printer if paper jams or the ink sheet adheres to the paper.
• Do not unplug the printer while it is printing. If you accidentally turn the printer off while printing, restart it and wait until the paper is ejected. If paper jams and cannot be removed, contact the KRUU Customer Support. Do not attempt to remove jammed paper by force, which may damage the printer.
• Do not use the printer near motors or other devices that generate strong magnetic fields, near TVs or radios, or in dusty environments. This may damage the printer or cause malfunction.
• Do not raise the monitor excessively. The screen can be raised to about 45°. Attempting to raise it further may damage it.