Installationsvejledning
KRUU Photobooth Premium
Set up of the Photobooth. Easy peasy.
Important information:
· No stand is included for the Premium printer. Simply place it on a high table or similar
· Only suitable for indoor use
· No direct sunlight
· The printer cannot be operated at temperatures below 10 °C and high humidity
Note on the return
First, please stick the return labels over the shipping labels! You also find your return labels available for download in your online customer portal!

KRUU Photobooth Premium –included
KRUU audio gæstebog
Så nemt fungerer det.
Gør dit event uforglemmeligt, og fang dine gæsters stemmer. Her kan du læse, hvordan du gør audio gæstebogen klar til brug i få trin.
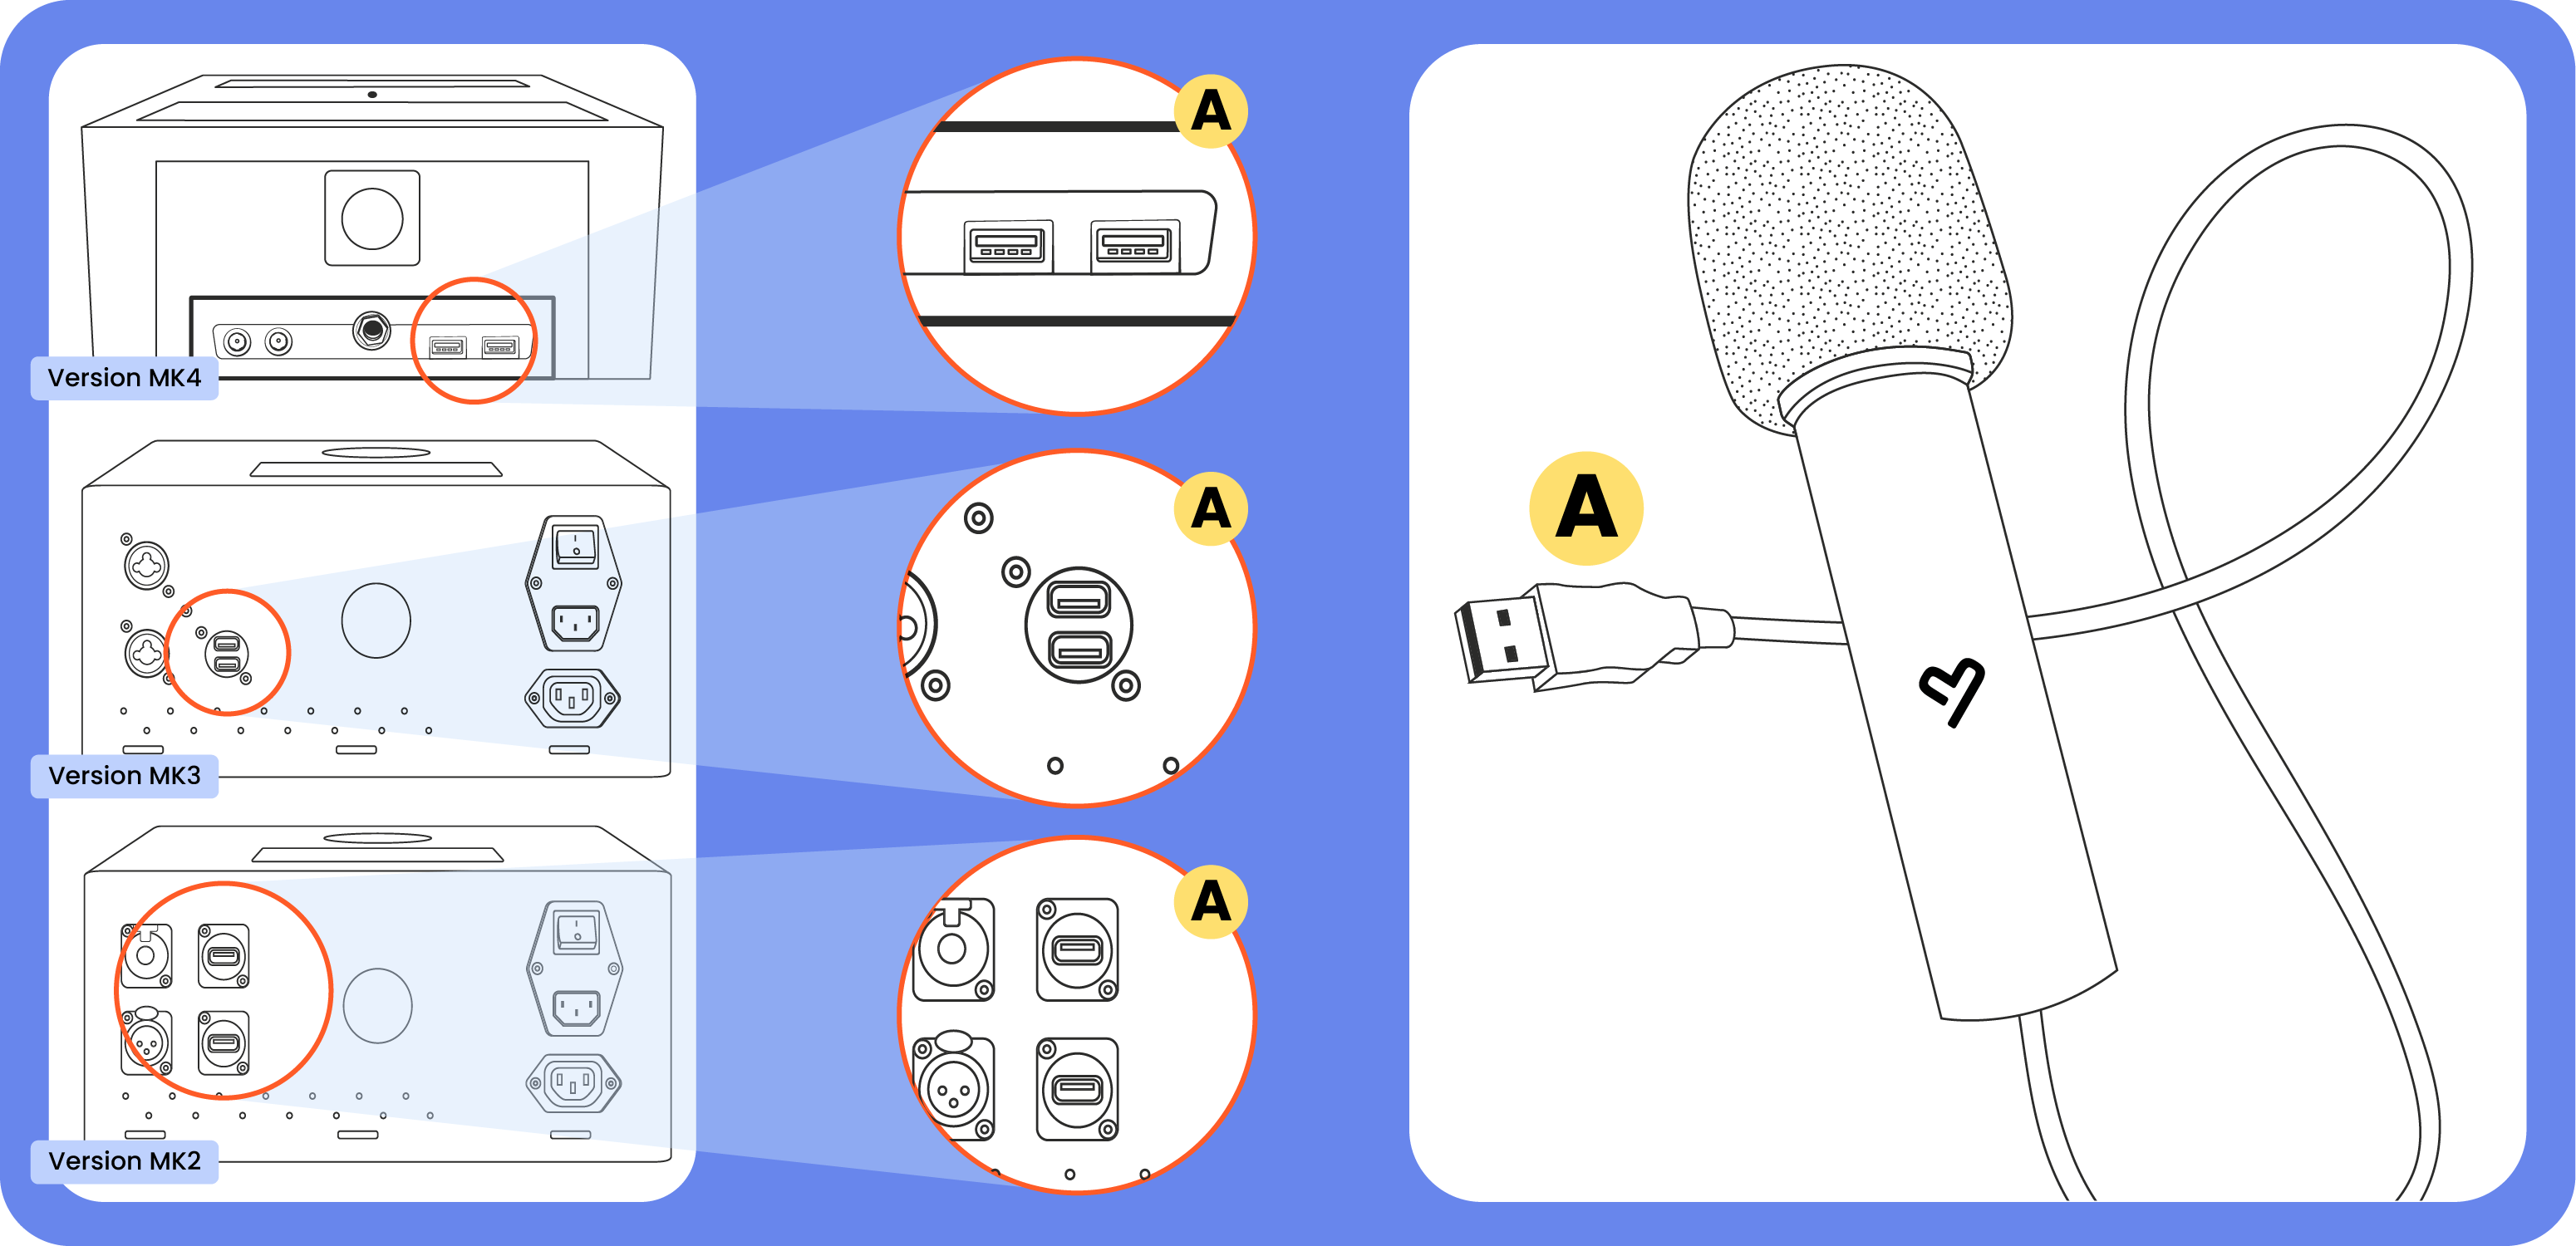
1. Tilslut mikrofon: Sæt blot mikrofonkablet i en af de ledige USB-porte på din KRUU Photobooth.
- Version MK4: USB-portene befinder sig på undersiden af kabinettet.
- Version MK3 & MK2: Tilslutningerne sidder på bagsiden af photoboothen.
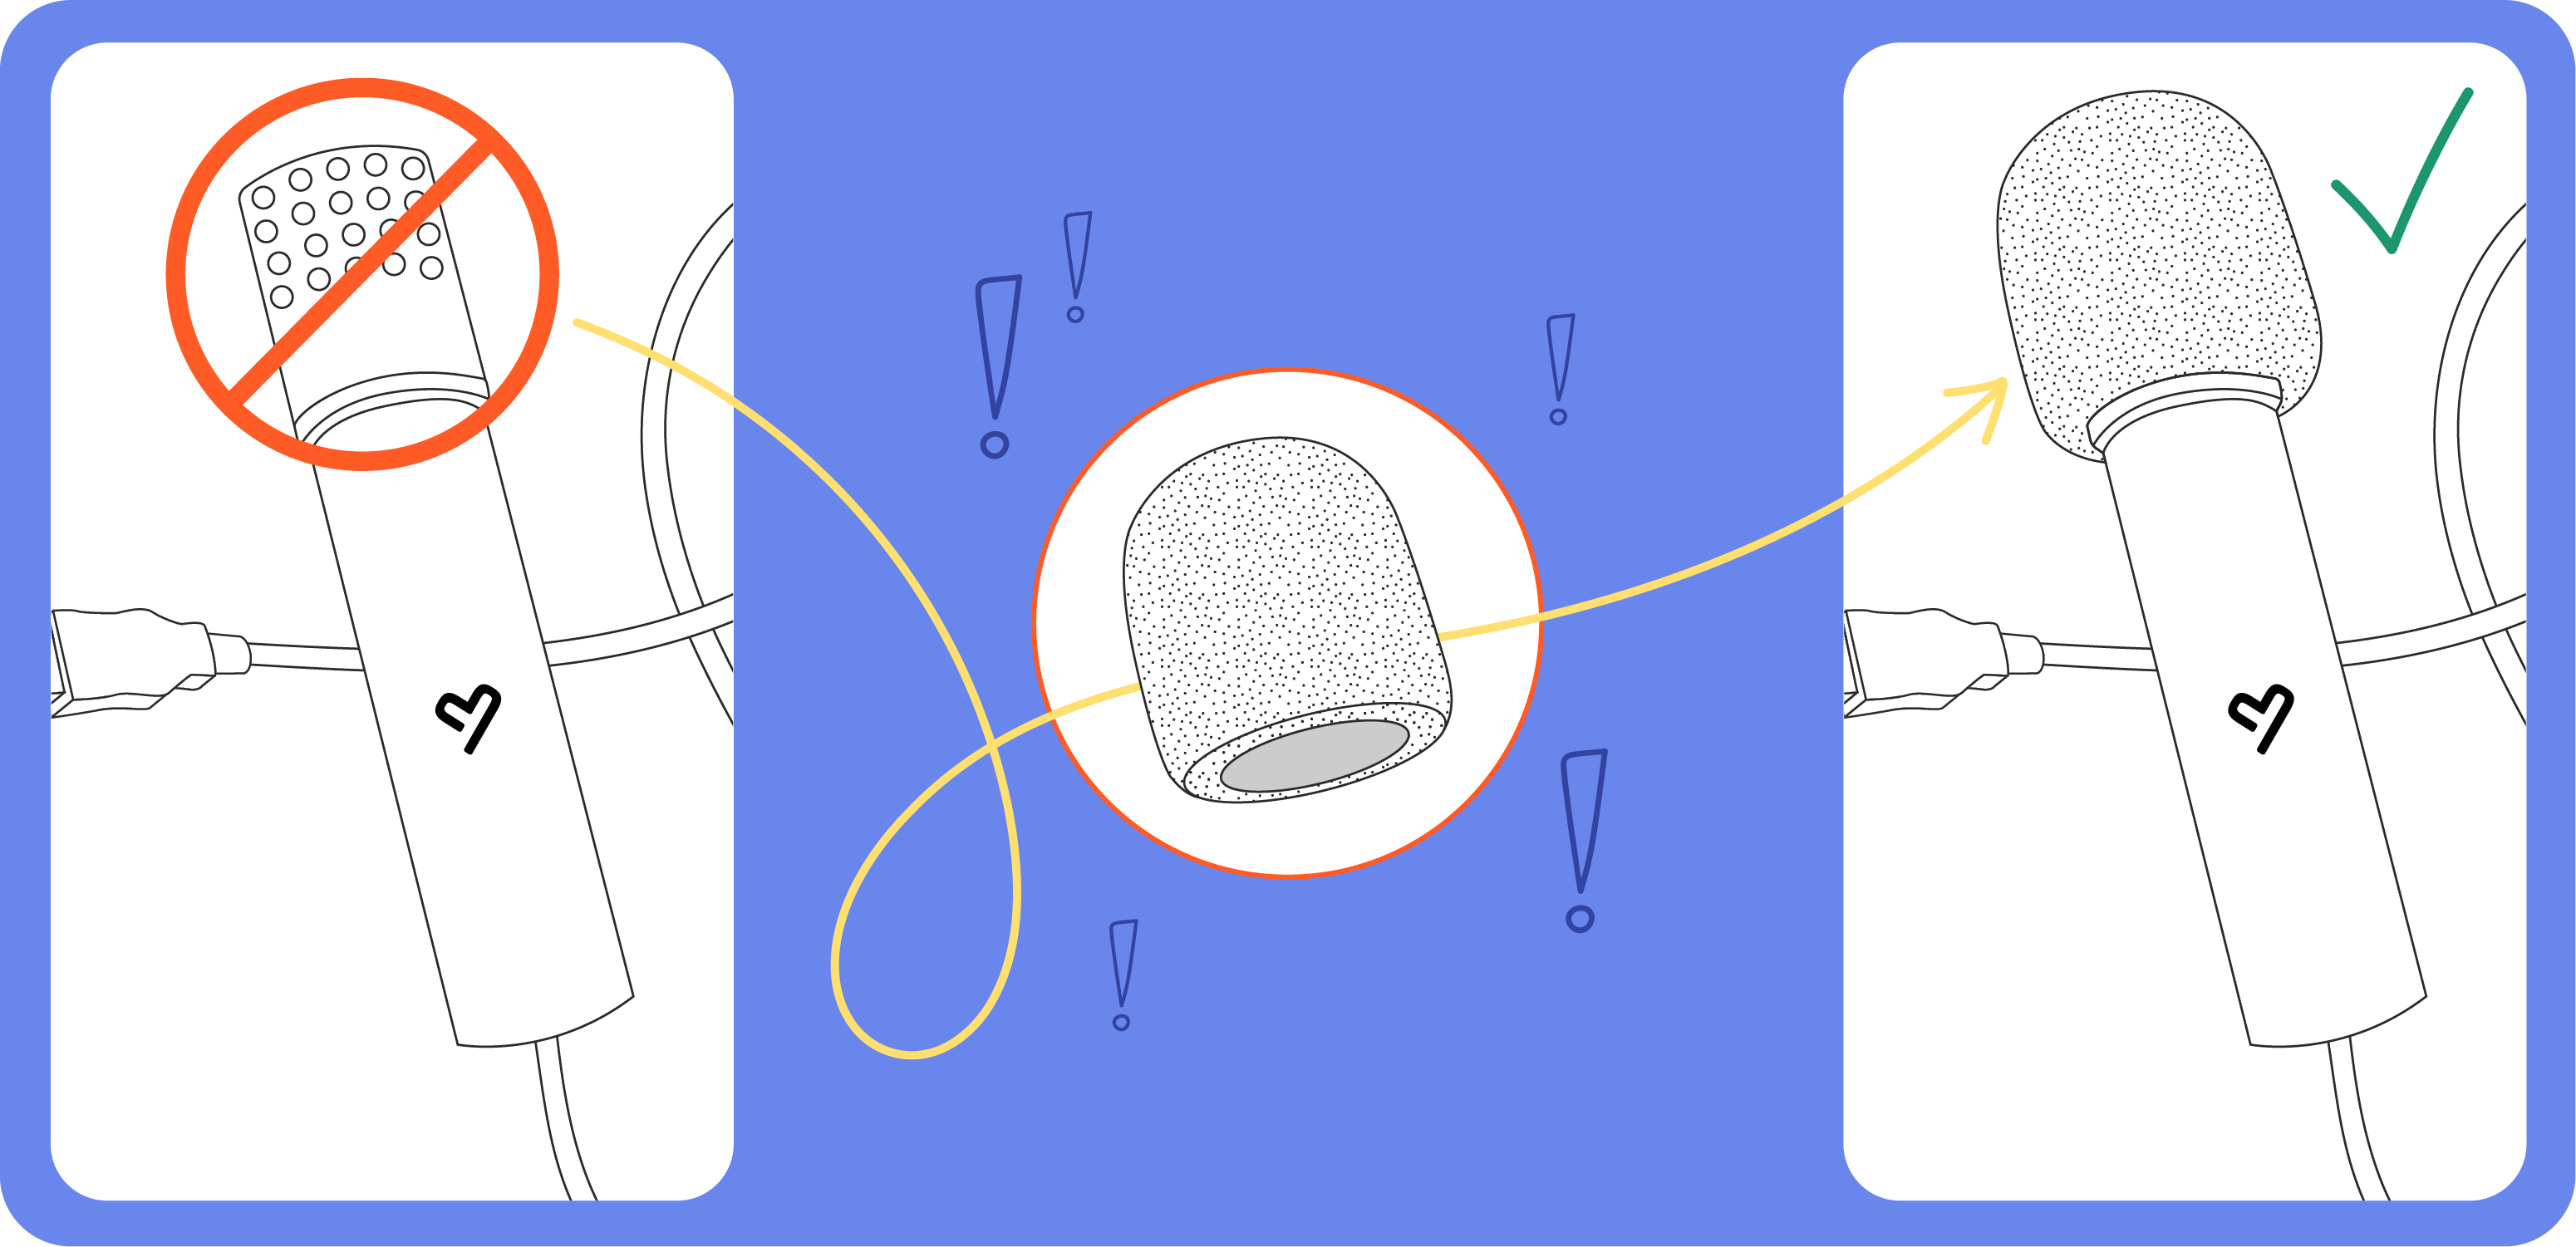
2. Påsætning af skumbeskyttelse. For at give dine gæster en tryg oplevelse: Brug den medfølgende skumbeskyttelse. Skub den ganske enkelt ned over mikrofonhovedet.
3. Automatisk aktivering: Så snart mikrofonen er tilsluttet korrekt, bliver "Audio"-knappen automatisk aktiv på skærmen. Dine gæster kan nu optage deres talebeskeder (maks. 60 sek.).
4. Optagelse & rettelse Dine gæster indtaler their hilsner direkte i mikrofonen. Efter optagelsen har de et valg: Beskeden kan gemmes direkte eller ganske enkelt optages igen, hvis de ikke er tilfredse.
5. Efter eventet: Alle optagelser gemmes sikkert, og senest syv dage efter at KRUU Photobooth er returneret til vores lager, vil alle talebeskeder blive uploadet og stå til rådighed for dig i din KRUU App.
Tip: Optag din personlige velkomstbesked i KRUU App på forhånd. På den måde bliver dine gæster budt velkommen direkte med din stemme!
Instant Pic Download – Dit foto direkte på din smartphone!
Sådan gemmer du nemt din collage i din galleri:
1. Scan & åbn appen
Scan QR-koden, der vises på photoboothens skærm efter optagelsen. Brug enten din smartphones kamera eller scanneren direkte i KRUU-appen.
• Har du ikke appen endnu? Dit kamera leder dig direkte til butikken (download appen – ingen login nødvendig!).
• Har du allerede installeret appen? Den åbner automatisk og starter processen.
2. Start download & tillad deling
Tryk på den viste knap for at starte downloadet. For at forbindelsen til photoboothen fungerer, skal din smartphone have følgende tilladelser:
Aktivér WLAN: Aktivér venligst WLAN på din smartphone. Kun på den måde kan der oprettes forbindelse til photoboothens WLAN.
Tillad adgang: Bekræft adgangen til din placering (på Android: »nøjagtig placering«) og dine fotos/galleri.
Opret forbindelse: Bekræft systemmeddelelsen om, at din smartphone må oprette forbindelse til photoboothen.
3. Gem & glæd dig
Bliv i nærheden af photoboothen, mens downloadet foregår. Så snart indlæsningsbjælken er færdig, gemmes dit billede automatisk i din smartphone-galleri.
Tip: Download KRUU-appen inden eventet – så sparer du tid på stedet!
1. Help Videos
Photobooth: Save images on a USB stick
Photobooth: Configure new design
Photobooth: Lock camera
Photobooth: Shoot camera
Photobooth: Start next shoot
Photobooth: Print collage
DNP printer: Paper jam
DNP – printer: Change paper
DNP – printer: Snip box missing
DNP – printer: Change colour ribbon
DNP – printer: Ribbon torn
IMPORTANT: Turn off the printer, unplug it from the outlet, wait about 14 seconds, plug it back in, and turn it back on. Then, follow the steps in the video.
Flash: Faulty sync cable
2. DNP Printer – Installation & Ribbon Replacement
Connecting cables
Connect the printer USB cable to the printer and the Photobooth (USB-input). Plug the power cable of the printer into a socket.

Turn printer on
Switch on the printer.

Open the printer
Pull the opening lever toward you to open the printer unit’s top door.

Set the new ribbon
Align left side (1) of the ribbon shaft with the groove and then lower right side (2) of the ribbon shaft.

Close printer
Close the printer unit’s top door.

3. DNP printer - paper roll change
Remove trash box
Remove the printer unit’s trash box.

Remove paper holder
Remove the paper holder from the printer.

Remove paper roll
Remove the old paper roll from the paper holder, and then set the new paper roll ensuring there are no gaps. Take off the holding devices and put them on the new paper roll.

Insert paper holder
Set the paper holder into the printer.
Set the seal on the paper (-> PULL) in the same direction as shown on the left.
Remove the seal (PULL).

Insert paper roll
Remove the seal, place a hand on the paper, and rotate the paper holder in the direction of the arrow to insert the paper leading edge until the buzzer beeps.
The ERROR LED changes from flashing red and orange alternately to flashing red.

Attach trash box
Attach the printer unit’s trash box.
Do not remove the trash box during printing. Doing so may cause trouble.
After everything is installed, the printer starts and adjusts automatically. White test prints are being made.

4. Solving errors – paper jam
Open the printer unit’s top door.
Pull the opening lever toward you to open the printer unit’s top door.

Remove the ribbon from the printer unit

Pull out the jammed paper toward you (paper holder side)
Rotate the paper holder by hand in the paper take-up direction to pull out the paper using the take-up force.

Pull out the paper end toward you.
When pulling out the paper, pull it out slowly. If a strong force is applied, the printer may be damaged.

Cut the paper straight with a pair of scissors

Alternative
If the paper cannot be pulled out toward you (paper holder side), open the printer unit’s top door and then pull out the paper with the following procedure.
First remove the paper holder in the forward direction and then cut off the part of the paper that is jammed.

5. Solving errors – ribbon is caught in the printer
Remove the ribbon
Remove the ribbon, insert a hand, and then grip the leading edge of the paper and pull it out toward you (direction of the arrow in the figure on the right).Wear a glove (without any fluff or powder on it) to prevent injury to your hand.

Pull opening lever
Pull the opening lever toward you to open the printer unit’s top door.

Pull ribbon out
Pull out the ribbon and cut it.

Reattach the ribbon
Reattach the ribbon with tape or similar and Insert the ribbon back in the printer unit. Rotate the take-up roller until the part attached with tape cannot be seen anymore.

NOTE
If the printer stopped with the paper partially cut, set the ON/OFF switch to OFF and then ON again. The paper jam is released and the cutter blade returns to its standby position.
6. Our support. At your service.

Call us directly at 80 88 12 91
Just send us an email to support-da@kruu.com
In case of technical questions we are available for you on Friday & Saturday until 9 pm!
Overensstemmelse og juridiske oplysninger
photobooth-modeller (MK2, MK3, MK3b, MK4) Når Wi-Fi-modulet aktiveres, bliver photobooth'en til radioudstyr i henhold til EU-direktiverne. Følgende oplysninger er en del af den lovpligtige informationspligt.
Radiofrekvenser og sendeeffekt Frekvenser: 2.400 – 2.483,5 MHz Sendeeffekt: maks. 100 mW e.i.r.p.
EU-overensstemmelseserklæring KRUU GmbH erklærer hermed, at photobooth-modellerne MK2, MK3, MK3b og MK4 samt den anvendte strømforsyning af typen HKY er i overensstemmelse med direktiv 2014/53/EU. Den fulde tekst til EU-overensstemmelseserklæringen findes her:
Teknisk dokumentation & overensstemmelse: Audio Guestbook
KRUU GmbH erklærer hermed, at Audio Guestbook (model KRUU Mila V1.0) er i overensstemmelse med direktiverne 2011/65/EU (RoHS) og 2014/30/EU (EMC). Den fulde EU-overensstemmelseserklæring og de andre testrapporter findes her:
7. Safety Precautions
NOTE
For safety reasons, the following precautions must be observed!
Power supply
• This Photobooth is designed for 230V/50Hz AC operation in Europe.
• The device must never be connected to a power supply that deviates from the specified voltage and/or frequency values.
• For the use of the KRUU Photobooth it needs a technically faultless and with a residual current circuit breaker fused (RCD/FI), earthed Schuko socket (230V/16A). The connections used must be made by a specialist and comply with the current DIN/VDE regulations.
Protection class and usage site
The device complies with protection class 1/IP20 – permitted usage site: Indoors (no humid rooms).
WARNING: DANGER TO LIFE!
Never open the casing of the Photobooth, the flash, or the printer to perform any repairs or trouble-shooting of electronic parts. There are live parts in the casing of these devices, which can cause a lifethreatening electric shock if touched!
DP-QW410
• Be sure to read these instructions in order to operate the product safely.
• Follow these instructions to prevent injury or harm to the operator of the product or others.
Warning
Denotes the risk of serious injury or death.
• Use only power sources specified in this instruction manual for use with the product.
• Do not disassemble or modify the product.
• Do not expose the product to strong shocks or vibration.
• Do not touch any exposed internal parts.
• Stop using the product in any case of unusual circumstances such as the presence of smoke or a strange smell.
• Do not use organic solvents such as alcohol, benzine or paintthinner to clean the product.
• Do not get the product wet. Do not insert foreign objects or liquids into the product.
• Do not use the product where flammable gases may be present. This may cause electric shock, explosion or fire.
• Do not touch the product connected to a power outlet during lightning storms. This may cause electric shock.
• Periodically remove any dust buildup from the power plug and power outlet using a dry cloth.
• Do not plug in or unplug the product with wet hands.
• Do not use the product if the power plug is not fully inserted into the power outlet.
• Do not expose the power plug and terminals to dirt or let them come into contact with metallic pins or other metal objects.
• Do not touch the battery charger or AC adapter connected to a power outlet during lightning storms.
• Do not place heavy objects on the power cord. Do not damage,break or modify the power cord.
• Do not wrap the product in cloth or other materials when in use or shortly after use when the product is still warm in temperature.
• Do not leave the product connected to a power source for long periods of time.
• Do not charge batteries/battery packs at temperatures outside the range of 5 – 40 °C. This may cause electric shock, explosion or fire.
• Follow any indications to turn off the product in places where its use is forbidden. Not doing so may cause other equipment to malfunction due to the effect of electromagnetic waves and even result in accidents.
Caution
Denotes the risk of injury.
• Do not touch any parts inside the product. This may cause injury.
• Avoid using, placing, or storing the product in the following places:
- Places subject to direct sunlight
- Places subject to temperatures above 40 °C
- Humid or dusty places
- Places subject to strong vibration
This may cause overheating of or damage to the printer or adapter, which may result in electric shock, burns or other injury, or fire. High temperature may deform the product or adapters.
Caution
Denotes the possibility of property damage.
• Unplug the product from the power outlet when you are not using it.
• Do not place anything, such as cloth, on top of the product while in use.
Leaving the product plugged in for a long period of time may cause it to overheat and distort, resulting in fire.
• Never reuse paper for printing, even if most of the paper is blank. Reusing paper may damage the printer if paper jams or the ink sheet adheres to the paper.
• Do not unplug the printer while it is printing. If you accidentally turn the printer off while printing, restart it and wait until the paper is ejected. If paper jams and cannot be removed, contact the KRUU Customer Support. Do not attempt to remove jammed paper by force, which may damage the printer.
• Do not use the printer near motors or other devices that generate strong magnetic fields, near TVs or radios, or in dusty environments. This may damage the printer or cause malfunction.
• Do not raise the monitor excessively. The screen can be raised to about 45°. Attempting to raise it further may damage it.
Overensstemmelse og lovpligtige oplysninger
Når WiFi-modulet aktiveres, bliver photoboothen en radiotransmissionsenhed i henhold til den tyske lov om radioudstyr (FuAG). Følgende oplysninger er en del af den lovpligtige information.
Radiofrekvenser og sendeeffekt Frekvenser: 2.400 – 2.483,5 MHz Sendeeffekt: maks. 100 mW e.i.r.p.
EU-overensstemmelseserklæring KRUU GmbH erklærer hermed, at photobooth-modellerne MK2, MK3, MK3b og MK4 samt den medfølgende strømforsyning af typen HKY overholder direktiv 2014/53/EU.
Den fulde tekst af EU-overensstemmelseserklæringen kan læses på tysk her:
EU-Konformitätserklärung-MK2-MK3-MK3b-MK4-HKY-Netzteil